Centering images in edublogs

Kia ora koutou,

I’ve been asked about how we can center images in a blog post.

The most consistent way to do this is by adding a tag in the HTML

The first step is to embed the image, then jump into the Text view and add the center tag  <center> before the HTML of the image

So it looks like this…

<center><img class=”alignnone size-medium wp-image-906″ src=”https://metvickiasandpit.edublogs.org/files/2024/05/VA-About-Me-Blog-Sidebar-image-2-231×300.png” alt=”” width=”231″ height=”300″ />


If you go back into your HTML you may notice that a tag has also been automatically added at the end </center> This signals the end of the centered content.


Please note – you need to use the American spelling of center.


Happy blogging!


Final day of the Reading Practice Intensive

I am feeling like I read about in so many of the DFI participants blogs, with the final day here, I’m both surprised by how quickly this course (and year!) have gone, but also a bit sad to be farewelling my fellow RPI participants.

Gosh this programe really does live up to it’s name, it’s intensive, but there is so much good stuff in it! In the final wrapping up session where Georgie was reminding us of the goals and the various things we’ve touched on through the nine days. Whilst the majority of the content wasn’t new to me and there were even some of my resources used as examples it was really good to have this as a reminder of all those elements of good practice. It’s so easy as we are constantly trying new things, making adjustments to our practice to forget some of those tried true things which we know really work.

An interesting thing to consider, I’ve joined a book club this year – not sure if the RPI was in my mind and I was aware I needed to be reading more or not, but I’m now four months in and not only am I reading different books to what I would normally pick up. I’m also reading far more. I’ve been to the library several times and am really back into the swing of reading more. I’m always on the look out for new books too – so if you’ve got any suggestions, let me know and I’ll add them to my keep note of book recommendations!

Thank you to Naomi, Georgie and Toni for leading the RPI. I’m sure it will make a big different to the practice of those teachers who were able to take part. It will be interesting to see the results when the data is pulled together!


Embedding two items side by side in edublogs

During our dealing with data day one of our participants asked about how we could embed two items side by side. I found some information online with HTML for a table. I used this and then added the embed code for the various items inside the table. The HTML I used was from this site.  https://www.w3schools.com/html/html_tables.asp

<table>
<tbody>
<tr>
<th>Company</th>
<th>Contact</th>
<th>Country</th>
</tr>
<tr>
<td>Alfreds Futterkiste</td>
<td>Maria Anders</td>
<td>Germany</td>
</tr>
<tr>
<td>Centro comercial Moctezuma</td>
<td>Francisco Chang</td>
<td>Mexico</td>
</tr>
</tbody>
</table>

Which when used in the text section of a blog post looks like this.

Company Contact Country
Alfreds Futterkiste Maria Anders Germany
Centro comercial Moctezuma Francisco Chang Mexico


I then replaced the words Company and Contract with the HTML for the items I wanted to embed. It took a little tweaking to get the items to sit nicely next to each other which I did by adjusting the height of the objects, but overall I’m pretty please with how this has turned out. Have you tried to embed items alongside each other?


Embedding a Google Doc into Edublogs

To increase the size of a Google Doc that is embedded into an edublog you will need to add sizing into the HTML, see below for the details.


Original HTML

<iframe src=”https://docs.google.com/document/d/e/2PACX-1vRXfwCzv_XHktRQf7py7ir_NdzWK6P4AzP08yGvWn8PbxYM8nBL1TI3vWyUgwxRjZlqtBDIv7HYFX9U/pub?embedded=true”></iframe>


Adding the Size after embedded=true” like this….

<iframe src=”https://docs.google.com/document/d/e/2PACX-1vRXfwCzv_XHktRQf7py7ir_NdzWK6P4AzP08yGvWn8PbxYM8nBL1TI3vWyUgwxRjZlqtBDIv7HYFX9U/pub?embedded=true” width=”840″ height=”880″>


High res image

In response to a question from our facilitation team, we’ve been asked about using higher resolution images in blog posts. The image below is quite high res and was embedded using the HTML. This gives you a much better quality than can be achieve by using the Add Media button.


Planning a Reading Programme

Today was all about planning a reading programme and I felt like even though I’ve been out of the classroom for a while, there was a lot covered today that linked back into things that were a regular part of my practice when I was back in the classroom. Sometimes it feels like it’s been a looooong time since I had my own class and therefore feel quite rusty around some things. But to recognise so many of these elements and to know that knowledge hasn’t left the old brain what quite nice!

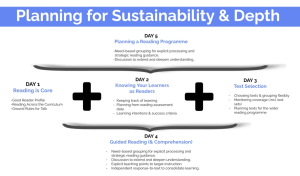
I’ve taken this screenshot here which captures the main elements of today. Love’d those “rules of thumb” around timetabling. It was always such a juggle to fit in all the elements we wanted to cover – and I feel like this is where things like the digital affordances really come into play – as Georgie said, if the programme is clearly laid out and the students know the expectations, then it can save you 10-15mins for each learning area – adding up to 30-45mins per day, where you can just say to the students “It’s reading time, go find what you need on the site and get going” rather than needing to go through what each group was doing, where they could find the things they needed etc etc. Of course this takes practice and can’t be leapt into on day 1 of term 1, but it’s about building those routines, just like all the other routines we build in our classrooms.

Looking further into the reading apps we touched on today, highlighted just how powerful these are – like so many teachers, I only really scraped the surface of these when I was using them in my classroom. It was great to have Naomi and Toni share their in depth knowledge of these, and then to think about the different purposes for these different apps.

I really enjoyed the activity we did where we were reading like Writers -taking the sample that Naomi shared and the way we were scaffolded to write our own passage through the use of a writing frame – such a great task and so powerful.

I feel very grateful to be able to take part in the Reading Practice Intensive. To see how the elements are interwoven and entwined to create such an rich full reading programme in a classroom is such a fabulous learning opportunity for myself, as well as for the teachers who are taking part. I really do wish something like this had existed when I was teaching in the classroom. Will there be any analysis of the reading data for the teachers who have taken part in the RPI this year? I think that would be really interesting to look into once the end of year data is gathered.

My blog post

Here is my blog post

Here is my blog post.


<a href=”https://sites.google.com/manaiakalani.org/va-dfisite-t1-2023/home”><img class=”alignnone size-medium wp-image-634″ src=”https://metvickiasandpit.edublogs.org/files/2023/05/Screenshot-2023-05-23-at-4.06.51-PM-300×167.png” alt=”” width=”300″ height=”167″ data-wp-editing=”1″ /></a>
But if I press enter it looks a bit funny.

RPI Day 4: Guided Reading

Beginning the day with Feedback and a reflection on the homework from our last session has been a great way to remind myself of what we focussed on last time. It feels like a very long time between sessions, particularly as I’m not in the classroom and so aren’t using this in my everyday practice. I really love the idea of the coverage sheet to be able to see clearly what is and isn’t being covered in your reading programme as I know that I didn’t have enough of a mix for my learners when I was teaching.

Guided reading is a main stay of reading and this time needs to be protected to support our learners to develop their reading skills.
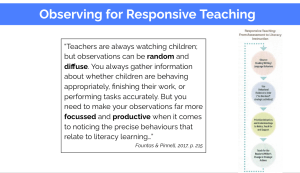
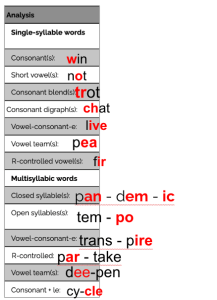
There were some valuable items touched on through some of the content today that I think is a good reminder for all of us around supporting learners to recognise syllables and with spelling rules which of course then have an impact on students ability to read – if they know the rules to help them work out the words they will be better able to improve their reading ability.

Such as Chin dropping = syllables and the difference between open syllables and closed eg be, to – long vowel sound. IF it is trapped by a constant it is a closed syllable pan-dem-ic

Spelling rules – need to be taught, but we need to ensure they are not just learning the patterns, they need to hear and say the sounds as well as read and write the words. This was an interesting activity to explore some of these spelling rules.
I really like the fluency scale to support  teachers to make judgements around how fluently the students are reading, and with the learner version they would be able to make these decisions themselves. The idea of getting the students to record themselves reading using Screencast or something similar and then self assessing against the rubric and also peer assessing – what a fantastic task to build up their own fluency!

Unfortunately our Reading Practice Intensive was cut short today due to the weather in Auckland. I’m looking forward to catching the afternoon session when Naomi shares the recording from Fridays cohort with us.

There is so much gold in this course, that I wish I had known about when I was in the classroom, and as Naomi and I spoke about after everyone else had gone to collect children/head home, even though there is an incredible amount of content covered that people couldn’t possibly implement all of it all at once, it provides those opportunities to reflect and implement small parts at a time, overall impacting larger change!